How to Make a "Rush" Woven Seat Chair Using Old Jeans (or Fabric Scraps)
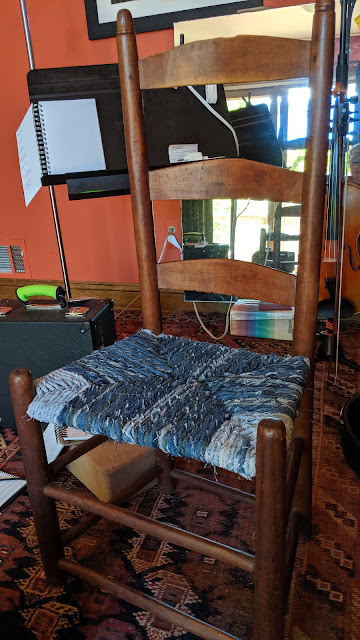
I used the technique for weaving a rush chair seat to make a chair seat using old jeans. The antique ladderback chair is just the right height for me to practice my Québécois button accordion.
Fabric Choice
Although at first I considered using t-shirt strips (also called tarn), I decided to jeans because denim is stronger and not stretchy. I had some old heavy linen fabric that would have done the trick, too, but I didn't have enough for the whole chair with either linen or jeans. I decided not to mix them, at least not for my first chair.

I was advised, (correctly!) by other crafters, that all I had to do was out the word out, and I’d get donations. I sent out 4 emails and literally went shopping and there were two pairs of jeans on my doorstep. I had five more pairs by the weekend. (Now I need another chair!)
Some Pointers
Before I describe the process, here are some pointers.


 After I realized the first pair was much lighter in color, I alternated the other two pairs when I sewed them, so the chair wouldn't look so "patchy."


Fabric Choice
Although at first I considered using t-shirt strips (also called tarn), I decided to jeans because denim is stronger and not stretchy. I had some old heavy linen fabric that would have done the trick, too, but I didn't have enough for the whole chair with either linen or jeans. I decided not to mix them, at least not for my first chair.

I was advised, (correctly!) by other crafters, that all I had to do was out the word out, and I’d get donations. I sent out 4 emails and literally went shopping and there were two pairs of jeans on my doorstep. I had five more pairs by the weekend. (Now I need another chair!)
Some Pointers
Before I describe the process, here are some pointers.
- I don't recommend doing this with a stretchy fabric. Therefore, if you use jeans, avoid the ones with lycra woven in.
- How much do you need? I used the fabric from almost three whole pairs of jeans to make this chair seat. Two of them were from a tall (34L) man, and the cuffs were in good shape so I undid the hems and got an extra inch for each strip.
To estimate the length of fabric, measure the width of the chair, and the depth of the chair. Figure out how the width of the rolled strips and how many it will take to fill the width, multiply that by two. Figure how many strips it will take to fill the depth and multiply that by two. Add these together. This is because each strip has to go over and back, and then across and back for each "run".
My chair was 15" wide at the widest, and 12" deep. The rolled strips were 1/4" wide, therefore:
(15*2*4)+(12*2*4*)=120" + 96. I added 15% because twisting the strips shortens the final rope. - I looked at this video on how to do rush seating, it was very helpful. Don’t worry, you don't need all those tools.
- When I took apart the old rush seat (they were real rushes, not the twisted paper people use now) I saw that the first few rush strips weren't held with tacks, the way they were in the video. Instead, they were tied to the sides with string, so I decided not to put tacks into my antique chair either.

- Sewing machine (optional if you don't mind hand sewing)
- Electric drill (optional but you'll be doing a lot of twisting)
- Large hook (use as drill bit on the drill)
- One or two heavy spring clamps
- Cutting mat and blade (you can use dressmakers shears instead)
- Ruler/cutting edge
- Stitch picker (I use single edge razor blades for this)
- Iron
- Needle and thread
- Take apart your jeans. The great thing about jeans is that the major brands like Lee and Levi have seams that are chain stitched. If you pick apart one stitch and pull the right end, the whole seam comes out. It can take a while to find the magic thread but it’s worth it. You can get an extra inch or more of width this way. If you can take out the hems in the cuffs, do that too. Take off the pockets. (The area under the pockets makes for a nice color variation). Cut off any remaining bits like belt loops (save those great jeans zippers!). Cut around any holes, etc. You should end up with four big long flat pieces.
- Before cutting, press the jean pieces, especially around the hems.
- Cut 1 1/2” strips along the lengthwise grain. At some point you have to cut a few shorter pieces, because of the shape of the leg - its up to you if you want to use those, it will just mean more joins/seams in the strips in the finished chair. They don’t really show, you can’t really feel them when you sit, but I did try to avoid using strips shorter than about 24”.

- Sew strips together. I recommend starting with about 10 strips. Sew the ends, right side facing, at a 90 degree angle so that the resulting seam is diagonal.


- Twist the strip into a rope. To do this I attached one end to a stationary object (doorknob) with a slipknot, and the other to the hook in drill, with a slip knot. You want enough clear run from one end to the other. If you go around any corners, the rope will stop twisting at the corner. Twist clockwise (just make that a rule so you wont forget. Trust me its a good idea). You want to twist till the entire rope is about (about!) 15-20% shorter.


- When finished I rolled it into a ball and secured it with an elastic band. You don't have to but it makes the whole thing a lot easier to manage. Obviously you have to balance the size of the "ball" (how many strips you have sewn together) with how big the ball is going to be - it has to fit between the rungs of the chair and inside the remaining hole you have in the center, which gets smaller as you go on.

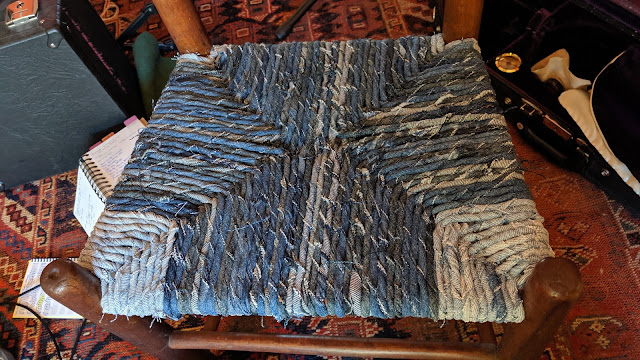
- Now start the weaving, based on the rush weaving instructions in the video linked above.


- Here's how I did the first few strips on the wider front part of the chair. I used a needle and thread, sewed through the strips, wrapped around the chair, sewed through the strip and tied a knot. I didn't cut the thread each time, so I had two threaded needles, one running on each side.

- When you encounter a seam, its up to you how you want to deal with it. I tried to twist them with the seam allowance inside, but it didn’t always take, and in the end it didn’t really matter to me.
- You may have to do a bit of extra twisting (or untwisting) as you go along to keep an even twist throughout. Most important is to draw the strip very tight over each pass. Once the seat is done, the fabric will inevitably stretch. You want to start as tight as possible
- Those strong spring clamps help maintain tension and then give you two hands free to work the twisted fabric strip. They also let you get up and take a break. (Note that I did not say they were optional.)


- At about the point shown above, you will insert the cardboard pieces in the top and bottom, as shown in the video at about 10:30. I forgot to take a pictures so here's one from a chair I made later out of black jeans and heavy-weight karate pants.

- When I ran out of strips, I left a long end, long enough to reach the sewing machine. I sewed some more strips together, twisted them, and sewed the end to what was already on the chair.
- At the end, I made a full hitch on the underside of the chair and tucked the end in using a crochet hook (you could use anything that will poke the fabric between the twisted strips.


Comments
Post a Comment